The Project Idea
After shopping around for various electronic components, I’ve seen some really cool “desktop robot” projects. In need of a new project, I decided to build my own. Along the way, I’ll be writing a series of howto guides so you can build one too.
The robot would stay on top of a desk, with an LCD for a face, and a “neck” which would allow it to turn left and right, up and down. It would have a camera and microphone, allowing it to see its surroundings, and interact with people. For a proof of concept, I wanted the bot to be able to:
- Use a camera for face tracking
- Follow faces with its eyes and neck
- Display cute expressions, which respond in real time
- Transcribe voices to understand tasks
- Be able to forward tasks to various APIs or AI providers
As I began a list of all the components I would need for the proof of concept, I realised how many I would need, and just how expensive they would be. I wanted the computer “brain” of the bot to be able to run basic transcription and face detection ML models, while running the rest of the software. Normally I would use a raspberry pi, but I wanted something faster and preferably cheaper. Even with the brain, I would still need to buy a camera, microphone and LCD. I realised that instead of all that, if I could find a way to get custom code and ML models onto a phone, I would need to buy much fewer components.
Version One
I started by installing Termux onto my phone, an app that adds a linux environment to android phones, which allowed me to use most programming languages, packages and libraries that are supported on linux. After a little hassle, I got the python open-cv package set up, and a face tracking caffe model. To get a live stream from the phone’s camera, I used a free IP-camera app, and for the display I used termux-x11. While this system did let me track my face in close to real time, it was pretty slow and messy as I needed to use 3 apps just for my code to work.
Finally, I pivoted to a browser-based program. I used the face-api.js library to run real time face detection models locally in the browser, and after viewing some example face tracking snippets from gemini, and reading up on CSS and SVGs on w3schools, I wrote a simple demo, with the face texture from an earlier game project, Macagotchi, following the biggest face it sees from the webcam stream. It was pretty easy getting that to work on my laptop, but getting it to work on any other device meant hosting the page on github pages, as many browsers block importing scripts from insecure hosts.
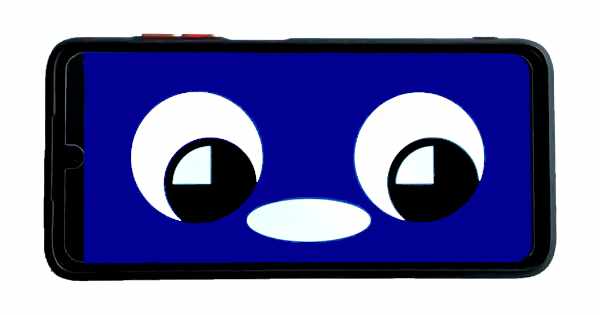
New Face Design
Next, I worked on a new version of the robot’s face, where the “pupils” could move separately from the rest of the face. The face is made up of stacked svg layers; a mouth, a “mask” with two circles cut out of it, which the pupils sit behind, a white “midground” layer, and at the very back the background of the page.

CSS Fixes
I originally designed the scaling of the svg layers on the desktop, where the mask layer would scale horizontally until it reached the edge of the screen, and then vertically to maintain the 16:9 ratio.
    .mask-layer {
      width:100vw;
      height:auto;
      max-height:100vh;
      z-index: 2;
    }
The mask layer’s original CSS.
Every other layer would scale horizontally to a percentage of the width of the screen. This worked great on desktop, where devices often have a “taller” aspect ratio than 16:9, but broke on mobile where the opposite is true. Since I knew that all of this would eventually be running on a phone, instead of having two versions of CSS for mobile / desktop, I settled on just hardcoding for mobile, where it would scale vertically before horizontally. In the future, I might decide to add better support for desktop, but for now (even with mobile scaling), it works pretty well.
    .mask-layer {
      width:auto;
      height:100vh;
      max-width:100vw;
      z-index: 2;
    }
The new mask CSS.
To make the new face look its best on a cramped mobile browser screen, I modified some JS from a w3schools tutorial, designed so that clicking anywhere on the screen prompts for fullscreen (browsers need some form of user interaction before a website can request fullscreen).
  /*Code modified from the w3schools tutorial implementation*/
  var elem = document.getElementById("container");

  function openFullscreen() {
    //Isn't it lovely that every browser has to have a different fullscreen method?
    if (elem.requestFullscreen) {
      elem.requestFullscreen();
    } else if (elem.webkitRequestFullscreen) {
      elem.webkitRequestFullscreen();
    } else if (elem.msRequestFullscreen) {
      elem.msRequestFullscreen();
    } else if (elem.mozRequestFullScreen) {
      elem.mozRequestFullscreen();
    }
  }
  document.addEventListener('click', function(event) {
    openFullscreen();
  });
Improving Performance
To improve the mobile performance, the page uses a scaled down version of the webcam stream, and uses the same input size as the vertical height. I also decided to use the detectSingleFace method, which is better optimised for detecting only one face. With lower resolution input, the model often had a lower confidence in face detection, even when it was right, which led to the eyes “losing track” of the face during sudden movement. For this, I just reduced the minimum confidence to 0.2.
// setting the options for the model
const detectorOptions = new faceapi.TinyFaceDetectorOptions({ inputSize: 320, scoreThreshold: 0.2 });

...
// using SingleFace detection
const detection = await faceapi.detectSingleFace(video, detectorOptions);
The way that face-api.js works, it needs a <video> html element to view a stream. I use display:none to hide it, but some browsers (like safari) try to improve performance by disabling hidden video elements entirely. This breaks the face detection, so I added a ?show-steam option to the URL which sets it to display:unset. Note that even with the video displayed, it might still get disabled if it’s off screen when not in fullscreen. If you use the show-stream version, I suggest going into fullscreen mode, as the video won’t be shown but (in my testing) it doesn’t get disabled automatically.
Try it yourself!
If you want to try out the face detector demo, it’s hosted on github pages and if you want to look at the source code, you can find the repo on github here. My second article, on connecting a servo to the robot, is out now. I’ll be posting more updates about the robot here in the future, so stay tuned!